How to Use & Create with Oxi Studios
Step-by-step tutorials on how to use our AI-powered tools to create stunning designs are coming soon to our YouTube channel!
How to Design an SVG Alphabet Sheet
Use this layout when creating a custom font sheet for Oxi Fonts. Keep every character as clean vector artwork, then export the whole 70-glyph sheet as one SVG file.
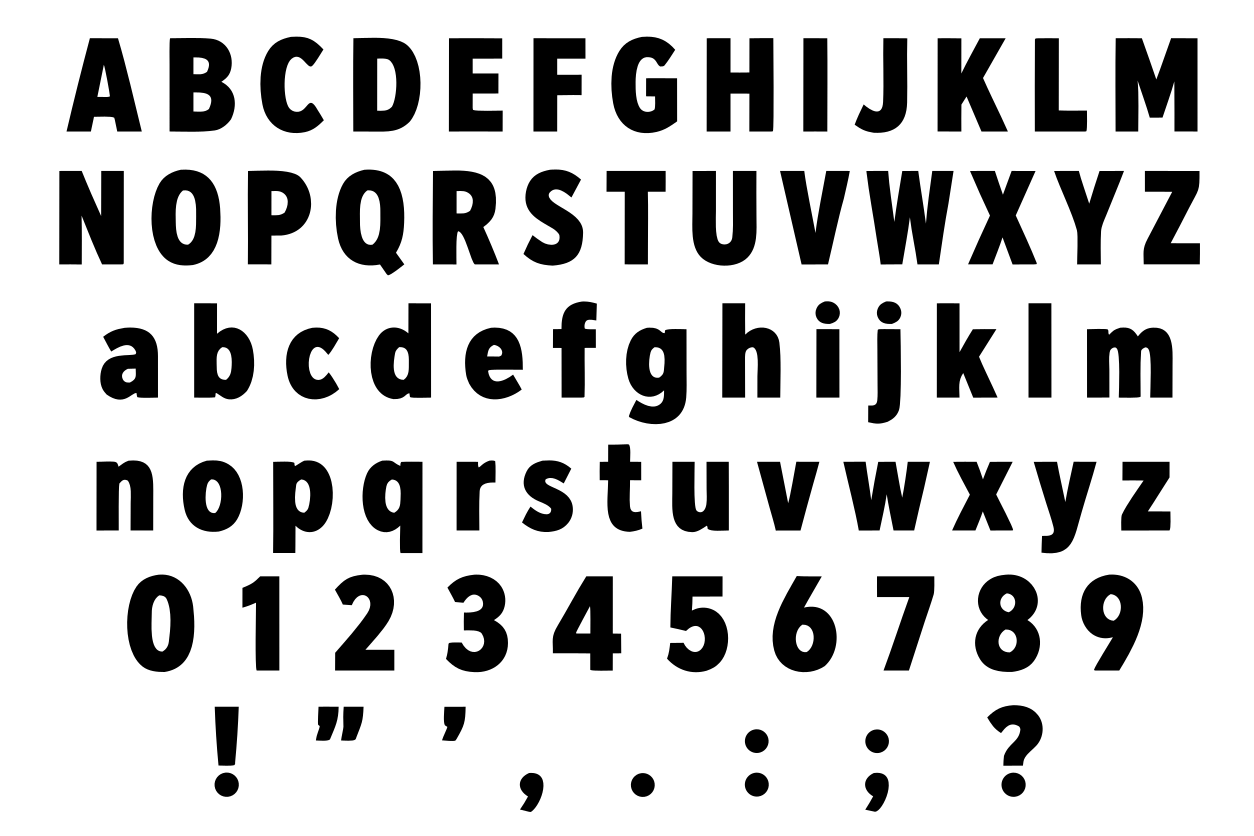
Sheet layout
- Row 1: A to M
- Row 2: N to Z
- Row 3: a to m
- Row 4: n to z
- Row 5: 0 to 9
- Row 6: !, ", ', ,, ., :, ;, ?
Design checklist
- Create all 70 glyphs: A-Z, a-z, 0-9, and punctuation.
- Use this exact punctuation order: !, ", ', ,, ., :, ;, ?.
- Use black vector paths on a plain white or transparent background.
- Keep characters separated so each glyph can be detected cleanly.
- Group multi-part glyphs as one object before exporting.
- Use consistent baseline, height, stroke weight, and spacing across each row.
- Convert text and strokes to outlines before exporting.
- Export one complete SVG sheet and upload it to Oxi Fonts.
Tutorials Coming Soon
Here's a sneak peek at what we'll be covering. Subscribe so you don't miss a thing!
How to Use & Create Designs with AI Tools
A full walkthrough of our AI-powered design tools - from generating your first image to exporting a finished design ready for production.
Creating 3D Relief Images from Photos
Turn any photo into a stunning 3D relief depth map and STL file, perfect for CNC carving, 3D printing, and laser engraving.
Vectorizing Images for Laser Cutting
Learn how to convert raster images into clean, crisp SVG vector files ready for laser cutters and vinyl plotters.
Convert Images to SVG then to STL
A step-by-step guide on converting any image to an SVG vector, then extruding it into a full 3D STL file for printing or CNC.
Generating Embroidery Designs
Discover how to transform artwork and photos into professional embroidery files using our Embroidery Lab tool.
Creating SVG Designs for CNC & Laser
Master the workflow for creating production-ready SVG designs optimised for CNC routing and laser engraving machines.
Don't Miss a Tutorial!
Subscribe to the Oxi Studios YouTube channel and hit the notification bell so you're the first to know when new tutorials drop.
Subscribe on YouTube